Don’t have an idea on how to install and setup iMessage on iPhone or iPad and other parts about the messaging platform. Most of the device owners end up having an error while activating iMessage on the screen due to several reasons. Of course, we are going to tackle the problem and start providing solutions. I will provide visual instructions, so you can follow on iOS 14 or iOS 15 phones and activate the messaging platform.
How Do I Activate iMessage on an iPhone?
What do you need?
- Activated SIM card: Ensure that you are using the mobile number that installed in the phone’s SIM tray. You cannot activate a mobile number that isn’t on the phone and receive an error instead.
- Enough credits: Yes, extra network charges may apply because iMessage will send a message to the Apple servers. Maintain $2 credits on the phone or enough for two standard messages.
- Active internet connection: Of course, I don’t think you need this whatsoever, but it’s good to have active internet on the phone will put you at an advantage.
I want to remind the readers that I recently restored the phone using iTunes. The old copy of the iOS version deleted and replaced by the Apple signed mobile operating system. In short, I’m using a new phone that doesn’t have BUGS and GLITCHES and no fragments of old files at all. My chances of getting an error are zero to nothing.

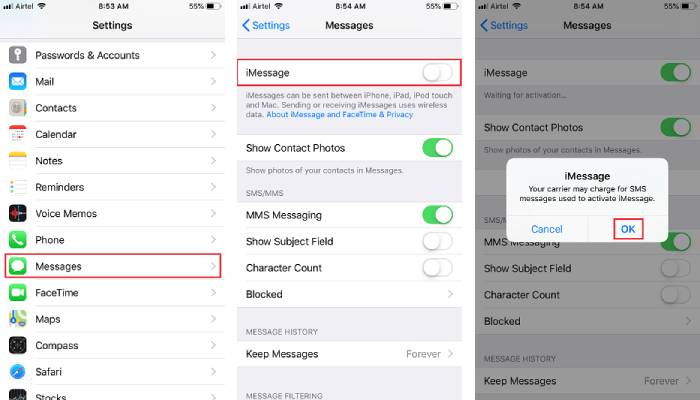
- Tap on the “Settings” and scroll down to the point, where the “Messages” icon is visible and click on it.
- Now, click on “iMessage” to enable it.
- A confirmation pop-up appears and tap on “OK” to proceed.
- Start texting the individuals, who have iMessage activated on the phone.
In many cases, iMessage isn’t working properly is a common issue that millions of iDevice owners encounter. We are glad to inform you that we have already covered a complete guide on it. Do check out the article and fix your iMessage problem.
Setting up iMessage using Apple ID on iPhone
Apple ID comes in handy when activating iMessage on an iPhone and iPad. You can use the same Apple ID on MacBook & iMac to access the text messages and communicate on PC. You need a SIM card installed on the phone for the process, I believe so.

- Tap on the “Settings” icon to open iMessage options.
- Now find the “Messages” and tap on it to open.
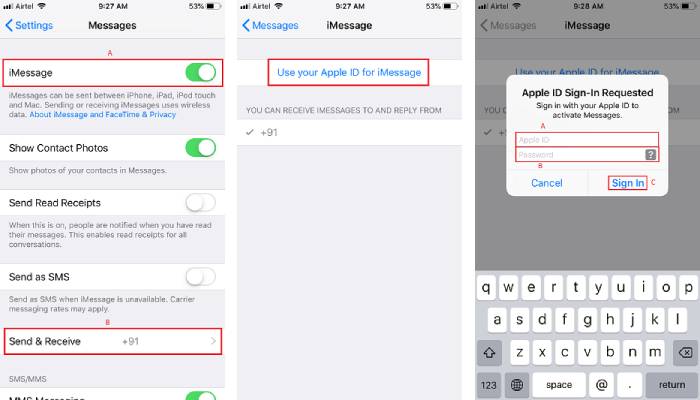
- Click on “iMessage” and then tap on the “Send & Receive” option.
- Tap on “Use your Apple ID for iMessage” to add the email address and password of the Apple account.
- The popup will appear and enter the credentials proceed.
- The account will be activated instantly. Now, select your email address in ”start a new conversation from” to send messages from the Apple ID.
The mobile number is appearing on my list because I activated it earlier, and you can avoid it if you wanted to do so. Fortunately, there are no restrictions on whether you want to add or change a mobile number or Apple ID for the conversations. I recommend going with Apple ID because it will keep your data intact and also keeps your mobile number hidden from the world. Of course, it’s all about privacy and does the right thing for the device owners.


