
Users can block emails and unknown contact text on iPhone & iPad using inbuilt features. There are multiple ways for users to block emails on iOS devices, and we don’t need third-party tools or apps to do it. If you are using dedicated apps like Google Mail, Yahoo Mail, Hotmail and other similar apps, then you have the option in the service itself. However, Apple has a Mail app and other features that allow the users to block specific emails on the device and avoid receiving & sending emails.
How to Block Contact in Mail Settings (iOS 14 or later)
Apple developed a dedicated Mail app for the users to sign up and use email services. You can connect Gmail, Yahoo, and other service providers in the iPhone and iPad, and you can block within the app itself.
- Tap on “Settings” to access Mail settings.
- Swipe down to find the Mail app and tap on it to continue.

- Swipe down till you find “Blocked Senders Option” and tap to continue.
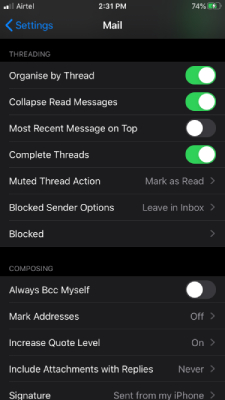
- You have multiple options, and you have to select one.
- Mark Block Sender (Enable it)
- None
- Leave in inbox
- Move to bin / Move to Trash
- Choose one, and we have selected “Move to bin” in the iOS 13 device, and the same instruction applies to iPadOS as well.
- Go back and tap on “Blocked” to continue.
- Swipe down to the bottom and tap “Add New” to continue.
- Select one contact.
Remember, you have to add the email address in the new contact, and that’s why there is an empty in the new contact form.
Block Email Text in the Mail app
Apple Mail app is integrated with inbuilt features that is one of the contributing reasons why consumers love to use it. You can block individual emails from the Mail app and never receive them in the inbox again.
- Tap on the Mail app to open.
- Fire up the email that needs to be blocked on the device.
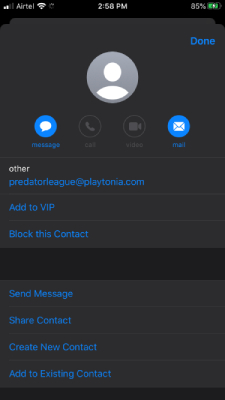
- Click on the email address on the top to reveal more options.

- Tap on the full email address to open more options.

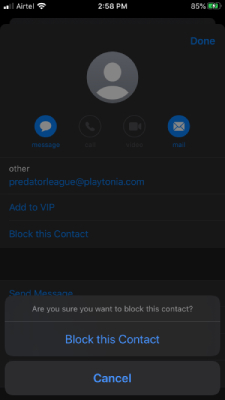
- You have complete access to the email address and tap on “Block this contact” to continue.
- Confirm the action by clicking on the “Block this contact” to complete the process.
You can restart the device and never receive the emails from blocked contacts anymore. The Mail app will no longer accept the email in the inbox, and it will be sent to the trash directly, and it is a straightforward way to fight spam.
How to block email on third-party apps in iPhone & iPad?
Apple App Store has lots of third-party developed apps like Gmail, and you might be using it right now. Fortunately, Google added a dedicated option to block emails in the app. You don’t have to worry about the iPhone or iPad because it will be applied to the account itself. In short, you can open the email account in the browser or anywhere else, and it will be blocked on all platforms.
- Open the third-party email app.
- Open the email received from the sender that you want to block.
- Tap on the three-dot option to view more options.
- Tap on the “Block (Sender Address)” to block the address.
- The email address is blocked on the device.
You can come back and open the same email to unblock the sender. Google Mail app is simplified by the developer and you have to do the same on all third-party apps like Yahoo mail, AOL mail, Outlook email, and more.
Bottom Line
Follow the simple guide to block emails on iPhone and iPad without complications. You can unblock the email address in the devices by following the same instructions, and there is no rock science going on here. If you are using iOS 12 or earlier devices, then the options may differ including UI because Apple made a lot of changes to the interface.