
Record FaceTime Call is possible on iPhone, iPad, iMac, and MacBook. Recording capability is a common feature on Apple devices after the manufacturer introduced stronger hardware & software compatibility in iOS 11 edition. I even recorded Video + Audio together to understand the limitations and learned plenty of things about it. First, I will demonstrate in-built functions because the stability and performance are incomparable.
Is it legal to Record FaceTime Calls?
I’m a responsible writer, so I want to inform the readers about the consequences of the recording without the opposite person’s consent. I do not want the readers to get into trouble later down the line for recording a FaceTime call and get sued by the recipient.
Recording an individual can be illegal depending on where you are living right now. Every country or state has specific laws in this regard and where you are standing right now. Understanding the meaning of the law is important to avoid unnecessary problems.
It is always good to inform the recipient regarding the recording of the video or audio call to avoid legal problems. You have to inform the recipient, even when they are your friends or professional people, who work with you. Never take the law for granted because there are many provisions in the system that can be used against you.
How Do I Record Call in FaceTime on My iPhone or iPad
iOS 11 is a revolutionary update from the manufacturer because they didn’t make plenty of changes in the earlier versions. The 11th edition of the mobile operating system brought several bugs and performance decline that forced Apple to release 12th edition for older machines such as iPhone 5S. Start recording the FaceTime call using the iPhone 5S running iOS 11 or above.
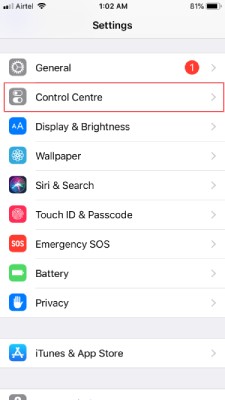
- Tap on the “Settings” and swipe down to find “Control Center” and click on it to continue.
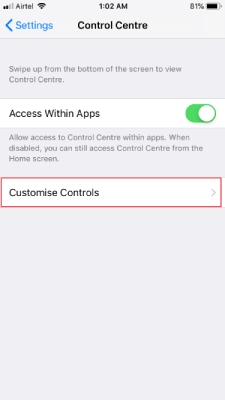
- Now, tap on “Customize Controls” to add a screen recording option.
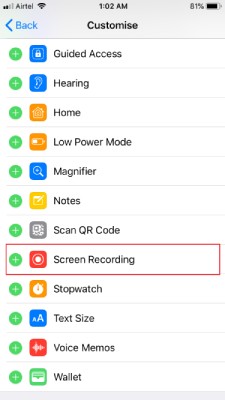
- Swipe down to the bottom to find out the option and then tap on the green button located beside “Screen Recording.”
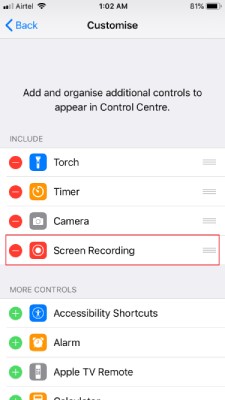
- “Screen Recording” option should be added to the list.
- Go back to the home screen and then swipe up to open the control center and then press & hold on the “Screen Recording” icon.
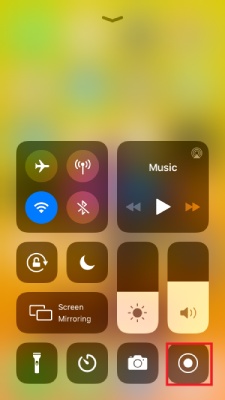
- Tap on the “Screen Recording” & select microphone in the list to turn on or off.
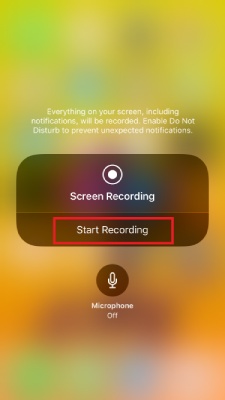
In the next three seconds, the recording will begin, and the red mark will cover the top bar. You have to turn off the recording option in the control center manually. The video file will be saved in the Photos, so make sure to check it.
An alternative solution for iOS Device: DU Recorder
DU Recorder is a popular solution for Android and iOS devices. The application gained immense popularity after they introduced live streaming capability.
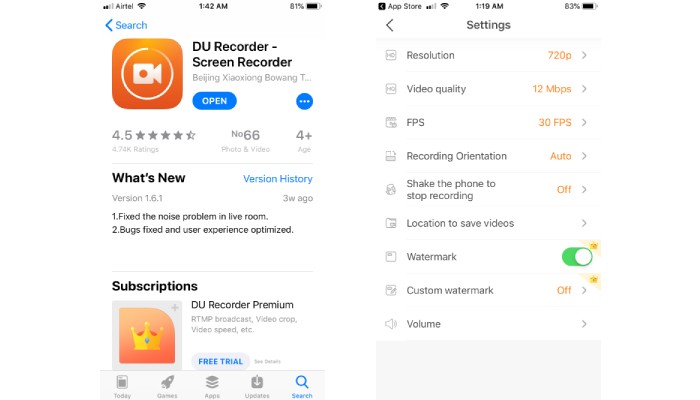
What I understood after using it for a while that DU Recorder utilizes inbuilt functions to provide 30 FPS, 720p, and up to 12 MBPS per second recoding capability in the free edition. I personally recommend using the Apple inbuilt feature because it is a stable feature that has lesser chances of failing.
How Can I Record a FaceTime Call on My Mac or MacBook
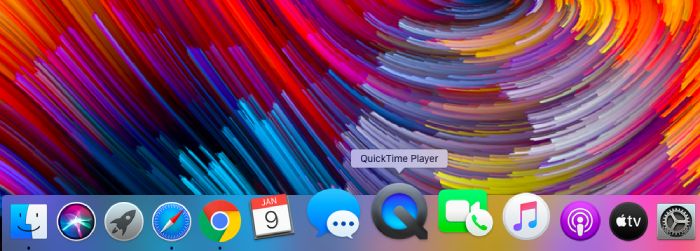
Apple launched QuickTime Player on December 2, 1991, and that’s a long time if you ask me. Over the years, Apple improved the technology of the video player, and they added multiple functions to make it invincible in this category. QuickTime integrated with screen recording capabilities, and it provides stable recording on a wide-range of MacBook & iMac computers.
- Click on QuickTime in the dock in macOS.
- Take a quick look at the top menu bar, and then click on “File” for the drop-down menu.
- The drop-down menu has several options under its belt but clicks on “New Screen Recording” to continue.

- Tap on the red button to start recording, but click on the arrow for internal microphone selection.
- Now, fire up FaceTime from the dock or applications menu.

- Start recording the screen & video call during the session.
Remember, macOS administrators can record the entire screen along, or they can use screen adjuster to record specific areas only. Fortunately, QuickTime can record Audio & Video of FaceTime, but it is recording capturing desktop audio and screen visuals, so make sure to control the environment for perfect capturing.
An Alternative Solution for Mac: OBS Studio
I personally use OBS Studio for advanced screen recording capabilities, and it is a powerful tool that millions of professional people utilize for the projects. Of course, macOS administrators need to spend 10 minutes or more to learn set-up and configuration because it is a complex procedure for beginners. Allow me to guide quickly to set up for recording the screen at the highest aspect ratio.
- Click on “Tools” located at the top menu, and then select “Auto-Wizard Configuration” to start the process.
- Select the second option, “optimize for just recording and I will not be streaming” and then click on “Next“ to continue.
- Leave the settings untouched here because I want to maintain default settings and then click on “Next” to continue.
- Click on the + button and then select “Display Capture.”
- Add multiple sources that I have added in the list and start recording the screen.
Wrapping Up
I do recommend using iOS in-built screen recording functions because it is a stable yet powerful feature, in my frank opinion. Coming to the macOS feature, I highly recommend using the in-built screen recorder for stability, but OBS Studio is an advanced program.
Hi,
I have tried to record audio and picture from facetime using the steps outlined
in your column… but cannot get sound.
I have tried this several times without success.
iPhone 11 ios 13.3.1
Any thoughts?
thanks.
Bill