
This article will discuss various software that record calls on iPhone. We will also be discussing the advanced features of voice memos. Also, you will get to know which alternate apps you can use instead of voice memos. So, let us begin with our article.
Millions of smartphone users want to record calls on iPhone & iPad devices. You have an inbuilt record button in many Android phones but it is not present in Apple devices.
Apple promotes privacy and that is why they avoided the function in the phone. Allow us to lay down a few ways you can record calls in iPhone and iPad that supports calling features.
Can I Record a Phone Conversation or Calls on iPhone?
It is crucial for the readers to be aware of the laws of the land because you don’t want to end up behind the prison or end up with legal issues.
Many countries have taken serious steps to ensure citizens’ privacy.
Many Chinese phones come with a record button because China doesn’t have strong privacy laws but Apple follows it in the Chinese market.
We cannot give you exact details on where to look and how to look as there are several countries that have a unique system in place. Call recorder apps are available in the market but you should consider the laws to prevent legal issues.
Apple followed basic doors that attackers use to invade privacy and they shut the common doors in the iOS mobile operating system.
The Cupertino-based company spent a lot of time on shaping the iOS software and they decided to block third-party apps to access the microphone, while the inbuilt phone app is active.
You don’t have a lot of alternatives but we can suggest a few apps and methods that you can use to record calls. Fortunately, there are a few apps available in the market that allows device owners to record calls.
How to Record Calls on iPhone?
The reasons for recording a phone call on your iPhone are several. Perhaps you’re conducting an interview and need a record of what was said.
In other words, maybe granny is about to share her special ingredient for apple pie, and you don’t want to miss it.
In addition, recording a phone call on an iPhone is essential for everything from documenting inappropriate comments from your supervisor to keeping track of client negotiations.
Since the iPhone cannot record calls, it’s essential to know this upfront: It’s far easier to record a phone conversation with an Android device. Because of this, iPhones do not allow you to record phone calls.
Third-party apps will not be able to access your microphone because Apple is very cautious about your privacy. So while recording a phone call on an iPhone is possible, you must employ some creative solutions.
Be aware that recording a phone call in some jurisdictions may be unlawful. You do not need one-party consent in some jurisdictions, such as New York, which allows you to record phone calls as long as one of the parties agrees to the recording.
In other words, if you live in New York, you don’t have to tell the other person on the line that you’re recording their phone call. The only thing to keep in mind is that you might want to inform others that you’ll be recording it.
Method #1: Record a Call on your iPhone when you’re on Speaker
It is ideal if you want to keep things simple, but you’ll need two devices to make it work. It doesn’t matter if you’re using an iPhone or any other speakerphone-enabled phone for the initial talk.
To record, you’ll need a second device. If you want to do this on an iPhone, iPod touch, iPad, or Mac, you can.
You can use any phone with a speaker to make the call and record it on your iPhone.
Make the call on your iPhone, then record it on a second Apple device using the same Voice Memos software that you already have installed on your phone. It’s all up to you and what gadgets you can use.
Start recording your phone conversation before you make the call if you want to catch everything. The following instructions show how to record a phone call on speakerphone on an iPhone using the methods below.
Depending on your model and operating system, the processes may be slightly different.
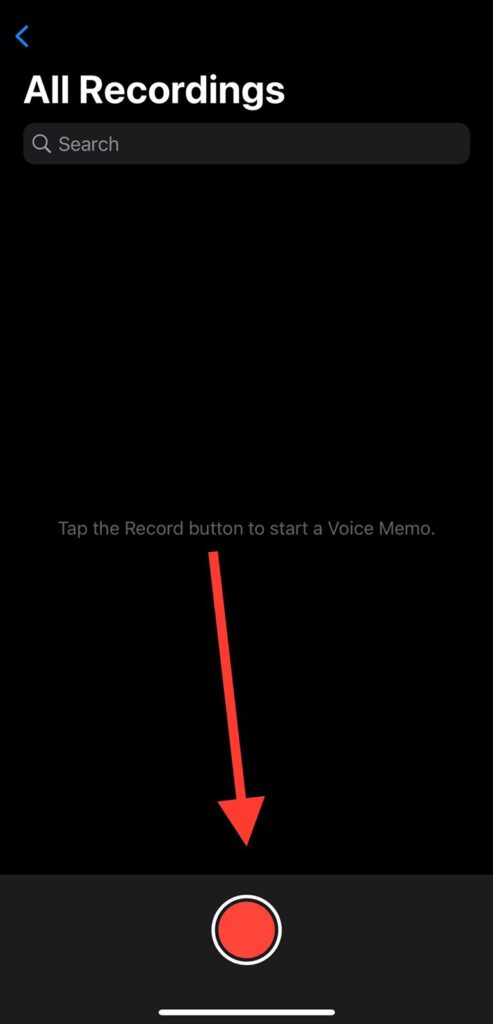
- Step #1: Use the Voice Memos app on your iPhone. Or you can use any app that you use to record.
- Step #2: To begin recording, press the red record button on the bottom right of the screen.
- Step #3: That concludes our discussion. Your recording has begun.
Method #2: Utilize Google Voice
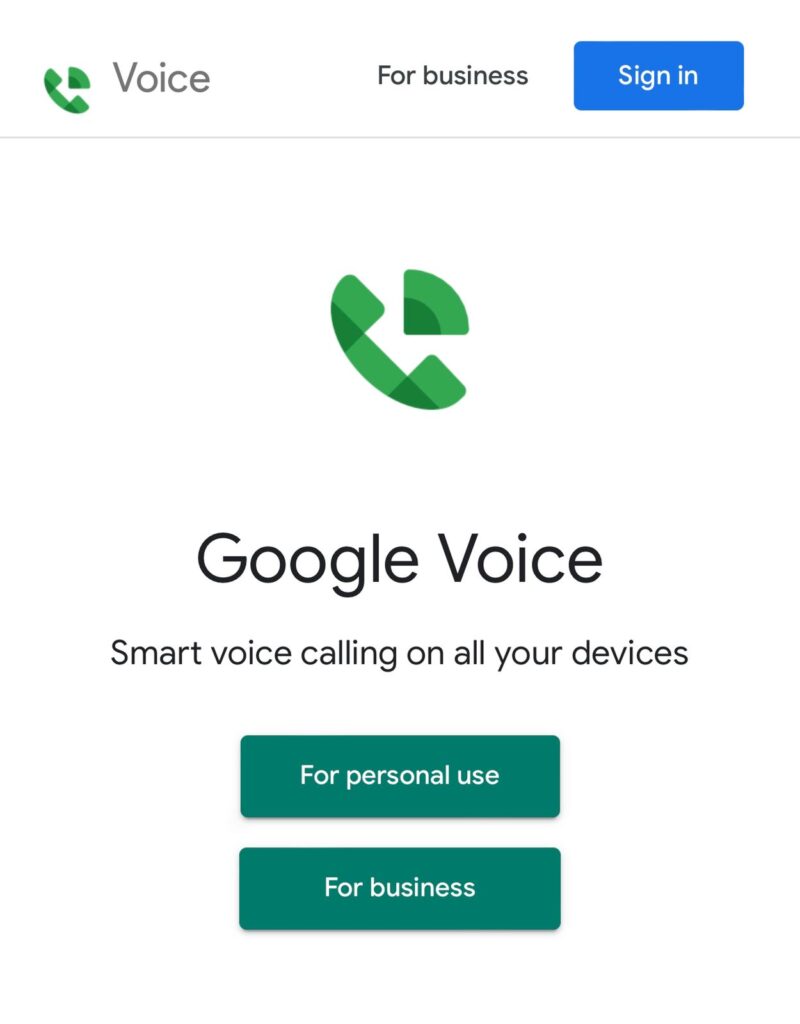
Use the free Google Voice account if you haven’t done so recently. It offers a free phone number, voice mail, and call-around service; yes, it even records incoming conversations.
When utilizing Google Voice on your iPhone, you can make outgoing calls but cannot record them.
Recording can only take place if you turn on the setting. Go to Settings > Calls > Incoming call choices on the mobile app or the desktop via voice.google.com.
By checking off the iOS Device in the app’s settings, you can choose whether calls are answered on your iOS device or sent to your cell phone. In either case, the recording is not on your iPhone. Google’s servers completely handle voice over IP (VoIP) connections.
Tap 4 on the number pad to answer your Google Voice number calls. It’s Google’s approach of ensuring that you stay inside the law; Alphabet Inc. doesn’t want to be involved in a lawsuit.
Tap 4 again or hang up to stop recording. To start and stop recording, press the 4 key as often as possible.
A voicemail recording is emailed to you and listed in your Google Voice account. You can usually distinguish voice mail messages and recorded conversations since the latter is longer and states, “Transcription not available.”
Method #3: Recording Calls using your Voicemail
Have you already configured your iPhone’s voicemail? You can record your voicemails using a straightforward approach. You’ll need a good cell phone plan for this strategy to work.
To begin, see if you have access to download your voicemail messages from your provider. Open the Phone app and select Voicemail from the Voicemail menu in the bottom right corner.
It is a good sign if you see a voicemail message list. You can save them to your device and play them at a later time.
You’re out of luck if you just see the option to Call Voicemail.
Voicemails will not be available for download. Your carrier’s audible voicemail may be able to save them for you. If you want to hear the message again, you’ll have to keep dialing your voicemail.
Use the speakerphone method outlined above to record the phone call on your iPhone to download these messages externally. Once again, depending on your phone carrier, you can use call merging and your voicemail to record calls:

- Step #1: Get permission from your contact to record the conversation. Tell them to hold on.
- Step #2: To begin a three-way discussion on your iPhone, hit Add Call.
- Step #3: Make a phone call to your number. Owning a personal voicemail box is a must.
- Step #4: Wait for the voicemail message to end. Get started by pressing Merge Calls.
- Step #5: It is time to hang up the phone. It’s best if your chat is saved as a voicemail that you can access later.
Method #4: Amazing Apps to Record Phone Calls on iPhone
App #1: Rev Voice Recorder
What’s so wonderful about this app? For starters, it’s completely free to use. You may record using Rev Voice Recorder even while using other apps on your phone. Not only can you record, but you can also easily share and cut your files.
When you end the conversation, do you want a transcript? Transcribing your audio recording into text is easy using Rev’s transcription service.
One drawback is that Rev’s transcription services are more expensive than those offered by other companies, which we justify because the company uses human transcriptionists rather than machines.
App #2: TapeACall
In more than 50 countries, this iPhone call recorder app is widely available and has a sizable user base. Our favorite feature of TapeACall is that you may record calls and keep them on the service’s server.
As an added convenience, conversations can be labeled before they get converted to MP3.
Use the free trial to determine if this is the correct recording app for you before paying for the service. I paid for TapeACall’s full version and found it to be a little difficult to understand.
Further, you begin each call by phoning the TapeACall recording line or placing a phone call and merging it to ensure that it gets recorded, a process that I frequently forgot.
That may be enough of a deterrent for others to remove the app permanently. Others may see it as only a stumbling barrier at the outset.
App #3: Otter
On the iPhone, Otter provides an easy-to-configure hack for recording phone calls. Using the speakerphone, you can record your chat in the same way you would a phone call.
For example, with Otter, you can transcribe the call, which can be helpful when it comes time to pull quotations or share notes. If you’re looking for immediate gratification, this software is not for you.
You may have to wait a while for the file to be processed before you can listen to it. The best way to catch mistakes in your transcription is to go back over it while the dialogue is still fresh in your mind.
Use Audio Equipment that are professional for Call Recording
Fortunately, we have reputed manufacturers supporting smartphone audio recording. You can purchase a piece of professional audio equipment that is compact in size and records high-quality audio.
- Purchase Zoom H5 4-Track Recorder, which is one of our favorite choices.
- Buy Male to Male XLR Cable.
- Purchase Apple Lightning to 3.5 mm Headphone Jack Adapter.
Readers have to spend a few hundred of getting the audio equipment to record the caller’s audio. However, it won’t record your audio because the Apple phone app has access to the internal microphone and the equipment is not able to pick up the device owner channel.
- Purchase any Cardioid Dynamic Vocal Microphone from the store.
- Purchase XLR Male to Female Microphone Cable.
Connect the external microphone to Zoom H5, and your audio will be recorded in the audio equipment. We have to say that this is an expensive process for the newbie, but you can watch a tutorial on YouTube to solve the problem.
You can seek guidance from the Zoom forums to get existing users’ instructions.
How to Record a Conversation on iPhone
Depending on the conversation you want to record, you can use various applications to record it on your iPhone. Using a native app to record a discussion that isn’t a phone call is the best option.
You’ll have to use third-party apps from the iTunes App Store to record actual phone calls.
Method #1: Voice Memos on iPhone
Select the blue “Voice Memos” app icon from the iPhone’s menu. You may find a red “Record” button to your left in the application.
Whenever your iPhone’s microphone picks up a conversation, it will record it. Stop recording by pressing the “Stop” button once on the right-hand side of the app window.
Method #2: Google Voice
Google Voice can be downloaded and installed through the iTunes store. A free iPhone program called Google Voice allows you to record incoming and outgoing calls made through the Google Voice application, among other functions.
On your iPhone’s internal storage, calls get saved in an audio file that you may access at any time. You must first register for a free Google Voice account to use Google Voice.
Method #3: Call Recorder Lite
The iOS App Store offers a free download of Call Recorder Lite. You can record Incoming and outgoing calls.
Once recorded, you can download and share your recordings using e-mail, iMessage, Dropbox, Facebook, and Twitter. A three-way call is required to merge the two calls.
Therefore if you have a three-way calling plan, you’ll need to activate it in the app. If you want to listen to more than the first 60 seconds of your recorded calls, you’ll have to pay $9.99 to upgrade to the Pro edition of the app.
Method #4: Call Recording by NoNotes
You can record incoming and outgoing calls using Call Recording by NoNotes. Call files can be saved to the cloud and shared through email or Facebook.
You may also pay for transcription services using the app. Using NoNotes’ Call Recording is a fantastic idea if you only need to record a few minutes of a call every now and then.
You can also use in-app purchases to buy more recording time.
Method #5: TapeACall Pro
TapeACall Pro, which costs $9.99 per year, is one of the most expensive call recording apps on the App Store, but it’s also one of the most well-rated, with nearly 2000 reviews as of August 2017.
Incoming and outgoing calls can be recorded without restriction and simply shared, downloaded to a computer, or uploaded to cloud services like Dropbox and Google Drive.
Like many other call recording apps, a three-way call lets you connect your recorded call to the company’s recording service in TapeACall.
(Important Notice: According to where you reside, it may be unlawful to record a phone call without the permission of the person you’re speaking to.)
Record an iPhone Conversation via QuickTime Player
If you have an iMac or MacBook computer then you can make good use of it. Apple macOS comes with a proprietary audio & video player called QuickTime Player, which is an advanced media player designed for modern computers.
QuickTime Player comes with recording capabilities, which is by far the best one to record iPhone & iPad screen.
Further, you can record voice calls from iPhone or iPad to QuickTime Player. Readers can record FaceTime audio & video calls via QuickTime Player, and it is the best solution available for free-of-cost. Yes, you need an Apple computer like the MacBook or iMac to make it work.
The audio & video quality will be top-notch, and it will be available in MOV file format that is playable on QuickTime Player. You can download VLC Media Player on Windows, Linux, and Android phones to play the video & audio.
QuickTime player makes it simple to record your own voice. Whatever the purpose, whether it’s to record a conversation or interview or as a practice tool for speaking in public.
In addition, QuickTime makes it simple to capture audio using an external microphone or the built-in microphone on your computer. Editing and storing your recording for later listening is then possible.
Step #1: Download and Run Quick Time Player
- You can get QuickTime from Apple’s website using a Windows PC.
- QuickTime is pre-installed in your Applications folder if you have a Mac laptop.
- You can also download QuickTime from Apple if you don’t already have it on your Mac.
- You can find the QuickTime Player in your Mac’s “Applications” folder. You can find it in the “Programs” subfolder of the “QuickTime” folder on Windows.
- You may get a start-up window when you first launch QuickTime. This window should be closed.
Step #2: Choose the “New Recording” Option on the Quick Time Player
To begin a new audio recording in QuickTime, you have several alternatives.
- If you are using a Mac, right-click on the app icon in the Dock. “New Audio Recording” will appear as an option. Open the audio recording box by clicking this option.
- You can also go to “File” and “New Audio Recording” to start a new recording.
- Choose “File” and select “New Audio Recording” on a Windows computer.
Step#3: Ensure to Connect your Headphones
- Click the dropdown arrow next to the red record button to bring up other options. The microphone you’re using right now can be seen in the dropdown menu.
- If your computer has a microphone, you can use it. Please make sure that “Built-in Microphone: Internal Microphone” is selected.
- It is possible to record using an external microphone plugged into your computer by selecting the “Built-In Input” option.
Recording Audio using Quick Time Player
Step #1: Stay in a Quiet Place
- If you’re recording with an external microphone or your computer’s built-in microphone, you’ll want to be in a room with minimal background noise.
- To produce a more transparent sound, record in a quiet room that isn’t too open or huge.
- The clarity of your sound can be bad by an echo in large, open spaces. Your microphone might pick up ambient noise or feedback in noisy rooms.
Step #2: Set the Record Quality
- The quality of your recording can be adjusted in QuickTime using a drop-down menu. You can adjust the recording to “Medium” or “High.”
- To change the quality of your recording, click the drop arrow next to the recording button. You’ll find them below the microphone options.
- The greater the quality, the better the audio will sound, but the larger the file.
Step #3: Adjust Recording Volume
- To modify the recording volume, use the slider next to the record button.
- The more noise your microphone picks up, the higher the recording volume. In a quiet, compact space, you may need to pull the slider halfway up or a bit past.
- A humming noise or distortion feedback can occur if the microphone picks up too much low-frequency noise when the slider is moved too far to one side. There are instances when you must reduce the sound quality by a significant margin. Check before recording to ensure the volume is appropriate for you.
Step #4: Start Recording
- Click on the red dot when you’re ready to begin recording. Recording will begin in QuickTime.
- Before you speak, give yourself a few seconds to gather your thoughts so you can make any necessary cuts.
- QuickTime will start recording, and you’ll be able to see how long it’s been since the last time you recorded.
- Another two bars that flash will show you how loud you are. You want to keep these input levels in the middle of the bar as much as possible. It won’t pick up audio if the volume is too low. It could distort if it’s too high.
- Adjust the distance between you and the microphone if your input loudness fluctuates too much on either spectrum.
Saving and Checking your Recorded Audio on the Quick Time Player
Step #1: Click the “Red” Stop Button to End Recording
- Stop recording by clicking the square grey Stop Button in the middle of the screen.
- In addition to Play, Fast Forward, and Rewind controls, you’ll see a Stop button.
- It will show a timer above these buttons to indicate how long your recording has been going on.
Step #2: Modify or Edit the Recording
- If necessary, you can edit your recording before storing it for export.
- Listen to your recording by pressing the Play Button.
- Editing your recording to remove bits you don’t need is an option if you are happy with the sound.
- To access your trimming options, go to “Edit” > “Trim.” You’ll now see a yellow bar at the beginning and conclusion of your recording that you may use to cut any bits you don’t need swiftly. Or you might only take a smaller portion of the recordings you made.
- To save your edits, click the Trim Button after you’ve made any necessary changes.
Step #3: Save the Recording
- To save your recording, select “File” > “Save.”
- Choose a name for your recording and save it to a specific location on your computer.
Step #4: Send or Export the Recording
You can also export your recording once you’ve saved it.
- iTunes allows you to save your audio track to your music library so that you can access it at any time. Further, it is helpful if you need to listen to it on a mobile device or incorporate it into an application like iMovie.
- Replay the recording. Once you’ve saved and exported your file, you’re all set. Furthermore, look for it in a saved location or use iTunes to find it. Ensure that everything is preserved accurately by giving it one more listen.
Advanced Recording Features of Voice Memos on iPhone
Feature #1: Pausing a Recording
Although it’s common to record straight through, there are situations when you may want to halt a recording. For example, you don’t need to keep track of your employees getting coffee at Starbucks during an important lunch meeting.
This iPhone trick will come in handy when you’re on the phone, and there are extended pauses in the conversation. Here’s how to go about it.
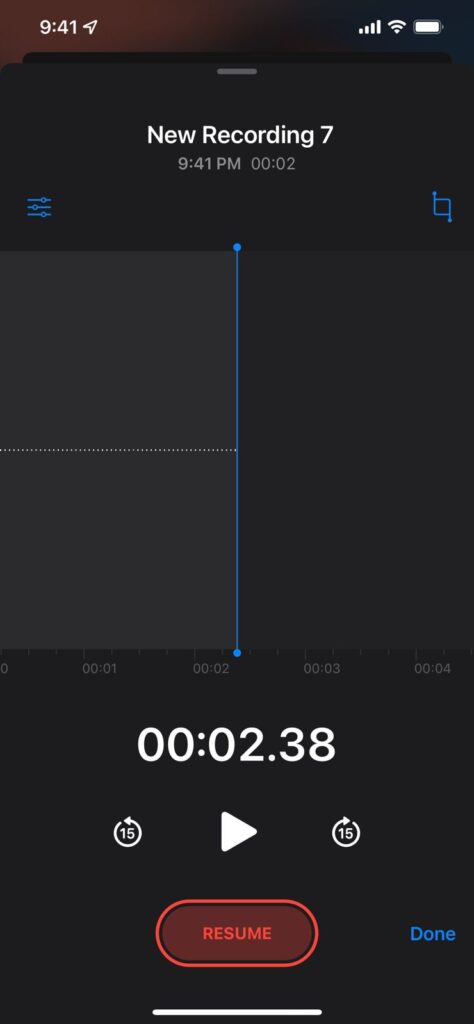
- Step #1: You can view Recordings in full screen by tapping or swiping up on the recording area at the bottom of your screen.
- Step #2: To temporarily halt recording, press the pause icon.
- Step #3: To continue, simply tap Resume.
Feature #2: Stop a Recording
Don’t forget to pause the recording after you get done recording your discussion, or you’ll end up with a huge voice memo using up valuable storage space. Here’s how to go about it.

- Step #1: If you only see part of the screen, press the red squiggle.
- Step #2: You must first pause the video in full-screen mode by pressing the word Done.
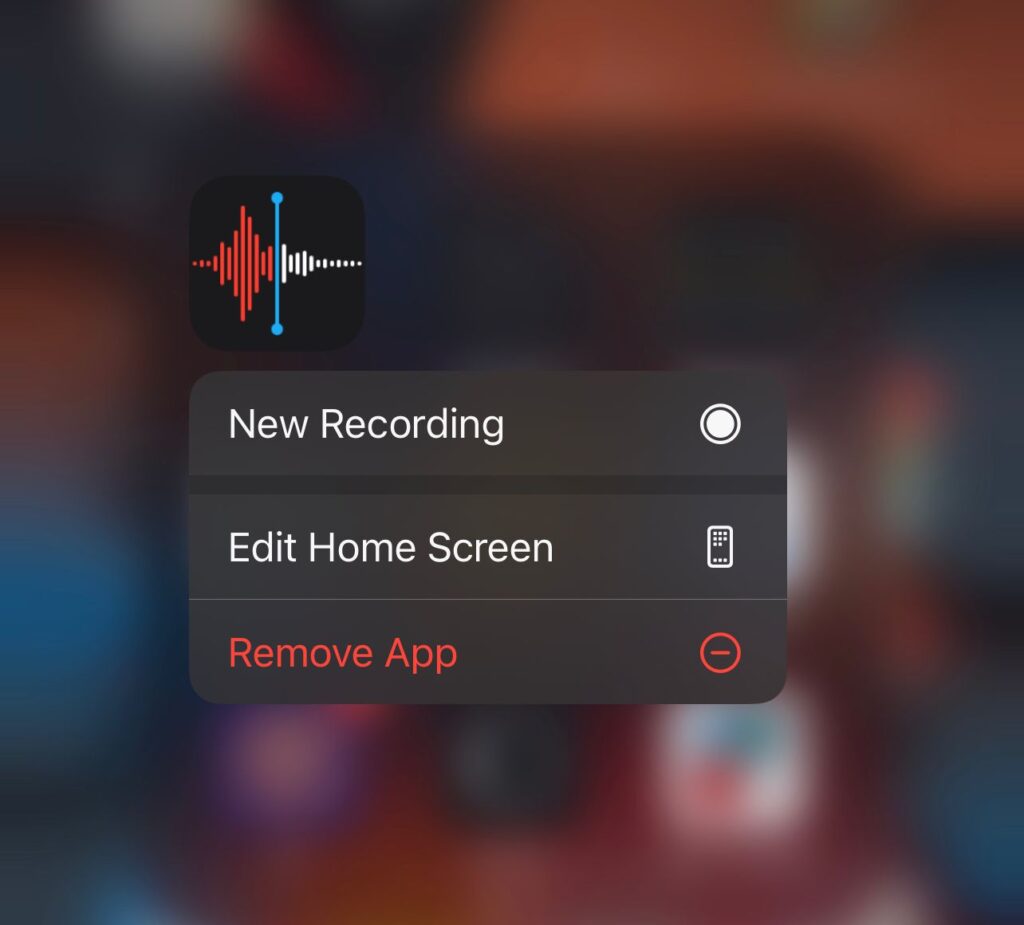
Feature #3: Deleting a Recording
Not all recordings are worth saving. It’s simple to erase if you don’t want it anymore. Here’s how you can accomplish it.
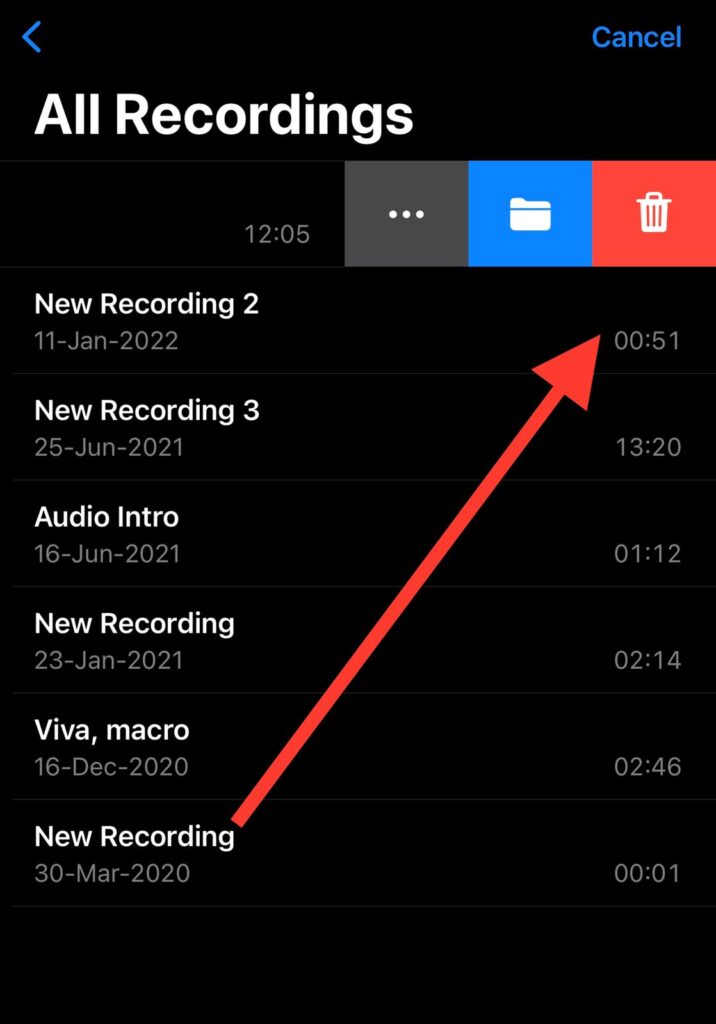
- Step #1: Find the voice memo you want to eliminate in the All Recordings list.
- Step #2: The field will expand when you click on the recording.
- Step #3: Toss some rubbish in there.
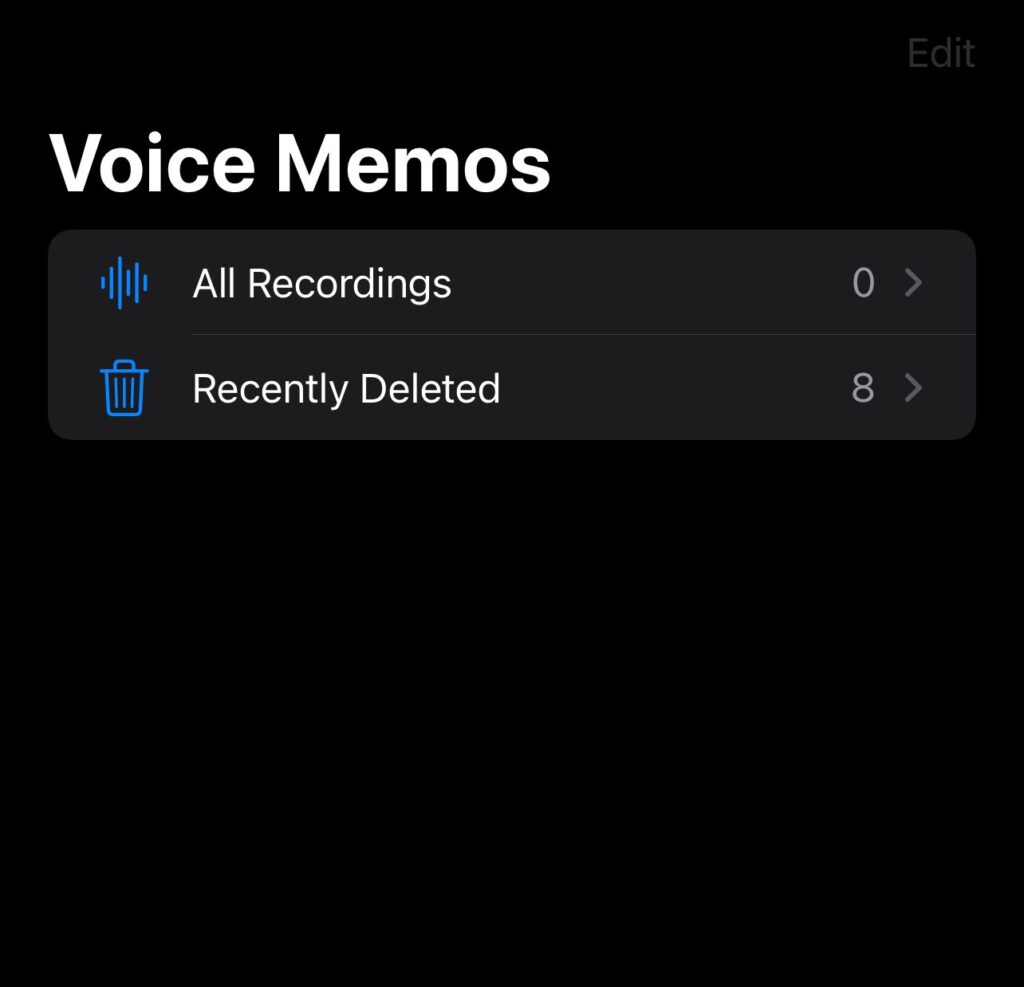
Feature #4: Recovering a Deleted Memo
Don’t freak out if you accidentally delete the wrong file. You can recover recently lost recordings as you may recover deleted images. If you follow these instructions, you’ll be good to go.
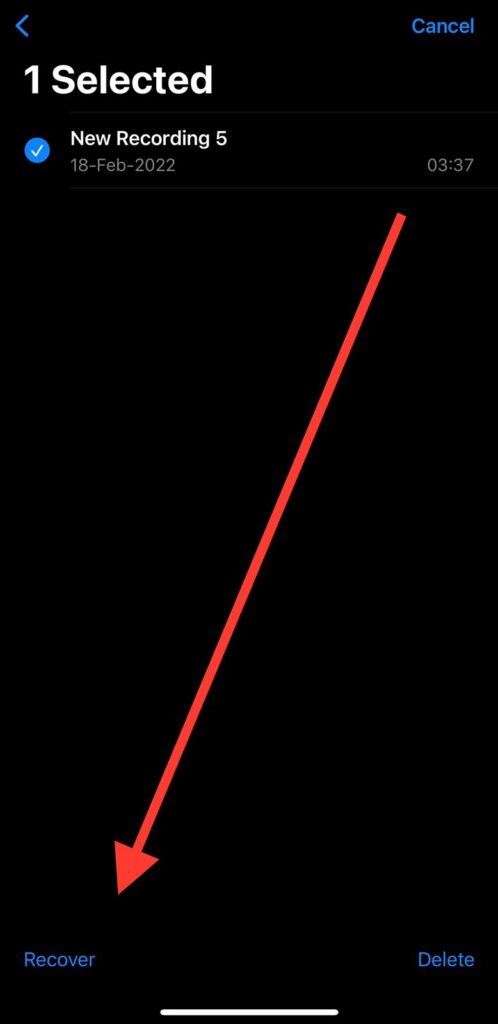
- Step #1: Take a look at the Voice Memos home screen.
- Step #2: Tap Deleted Items to see your deleted items.
- Step #3: Please tap on the recording you want to save.
- Step #4: To get your recording back, select Recover.
- Step #5: Select Edit in the upper-right corner to restore multiple deleted voice memos. After selecting the recordings, you want to restore, tap the Recover All button in the lower left-hand corner.
Feature #5: Rename a Recording
Don’t forget to rename your file to make it easier to find in the future. It is how you do it:
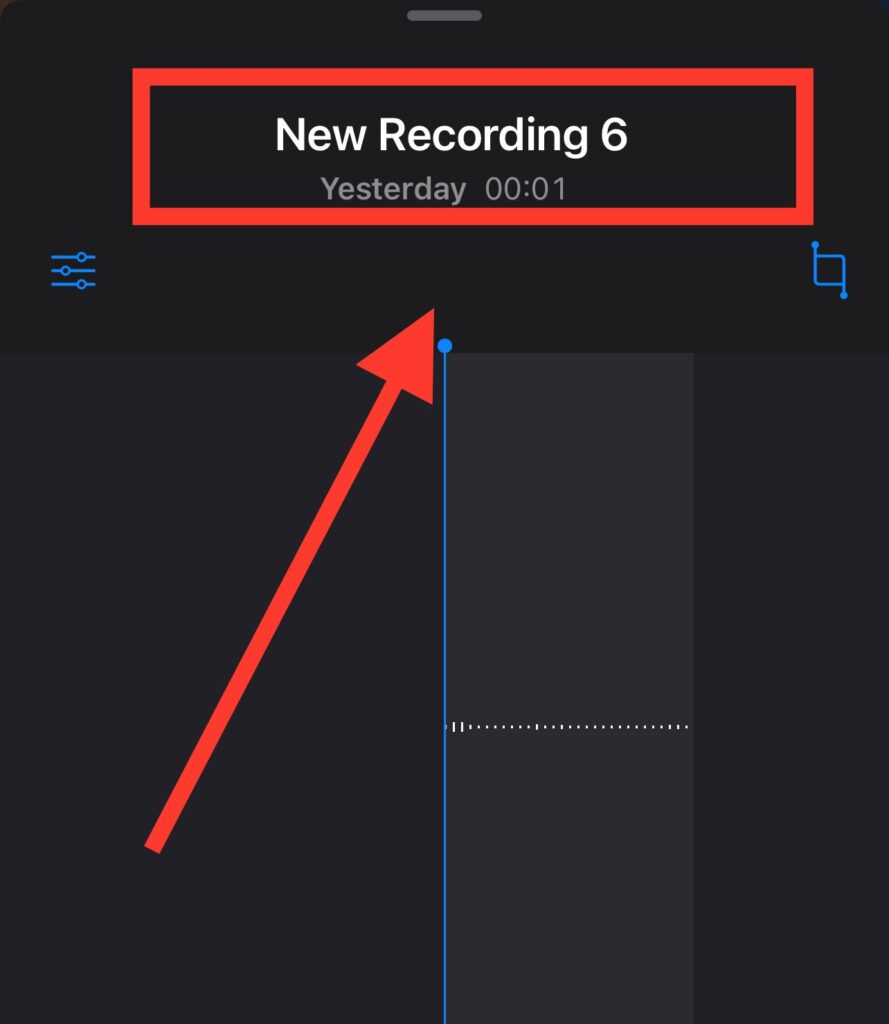
- Step #1: Tap on the Recording you want to rename.
- Step #2: Press the Rename option to change its name.
- Step #3: Enter the desired name.
Feature #6: Saving a Recording to the iCloud Folder
You may wish to store a recording in iCloud instead of Voice Memos to ensure you can access it from any computer or mobile device. You can keep your voice memos in the app and the folder of your choice by following the steps below.
- Step #1: To move a recording, simply tap on it and drag it to a new location.
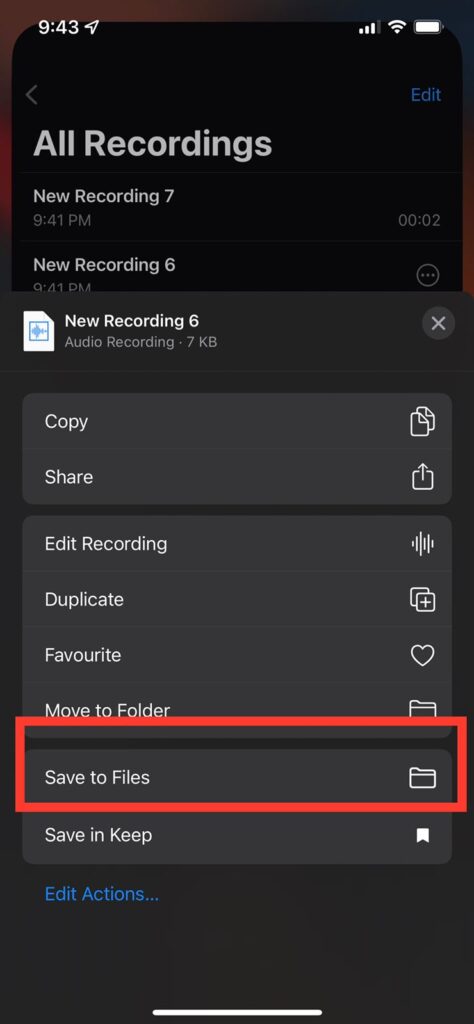
- Step #2: A three-dot circle is the one you’re looking for. Take a swiping motion with your finger.
- Step #3: Select Save to Files from the drop-down menu.
- Step #4: If you’d want to save it in a specific location, select the folder from the list.
- Step #5: Using the folder icon at the top right of the screen, you can create a new iCloud folder.
Feature #7: Organizing Recordings in the Voice Memo Folders
In the same way, you would categorize your apps. Moreover, you may want to organize your recordings if you frequently use the voice memo app.
There are folders on the leading Voice Memos screen where you can organize your recordings.
To put a voice memo in a folder, follow these steps:
- Step #1: You can relocate a recording by tapping on it.
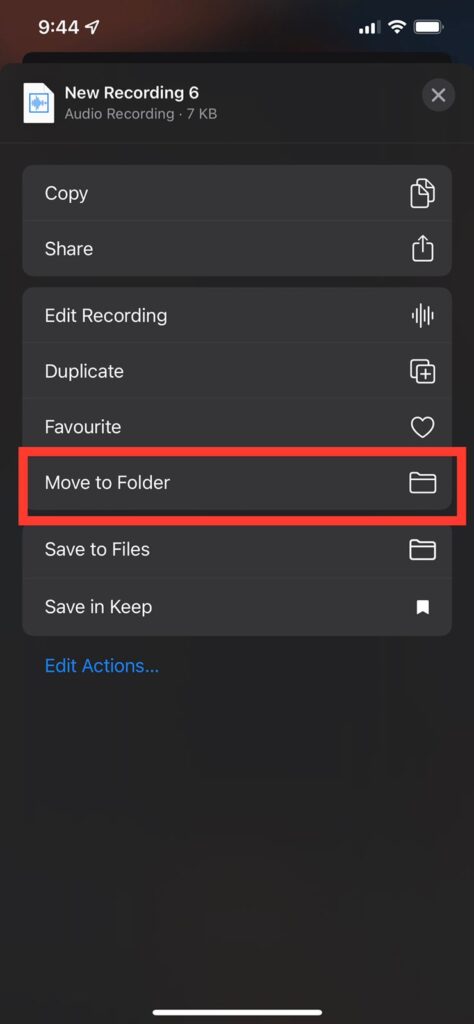
- Step #2: You need to tap the three-dot circle.
- Step #3: You can select the option from the drop-down menu below.
- Step #4: Select the location where you want your recording to go by tapping on the folder icon.
- Step #5: Tap the folder icon in the lower right-hand corner to create a new folder. Select Save after naming the folder. You can save your recording in that folder.
Feature #8: Crop or Edit the Recording
For various reasons, you may want to crop your new image. In addition, the parts of a recording that a musician doesn’t wish to share are often cropped out of the Voice Memos app by hand.
The function is called Trim in Voice Memos, even though the crop icon looks the same as in other programs.
- Step #1: Go to the All Recordings section of your library.
- Step #2: To crop a voice memo, tap on it.
- Step #3: Tap the three small dots in a circle button on the right of your recording.
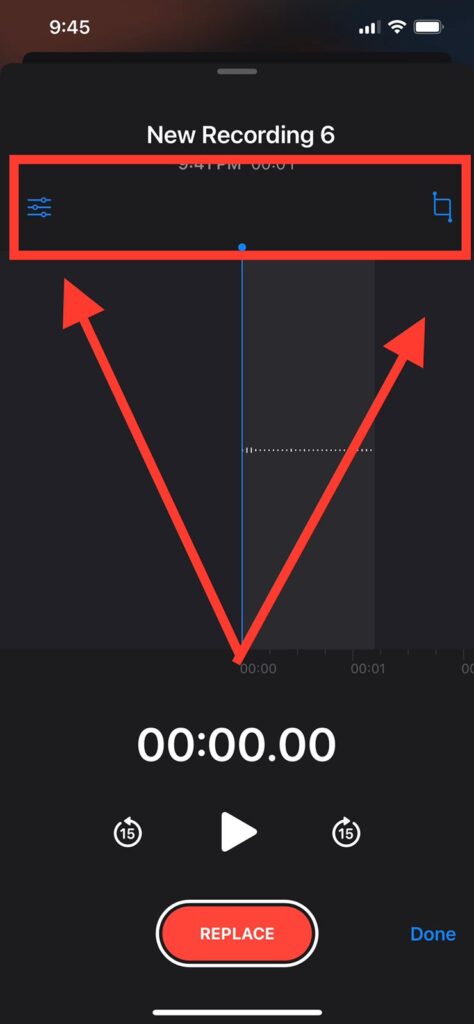
- Step #4: The Edit Recording option is available.
- Step #5: Right-click on the file and select “Crop” from the menu.
- Step #6: Drag the yellow trim handles until the yellow highlights of the part you want to maintain and the white highlights of the portion you want to crop are both highlighted in the document.
- Step #7: Ensure you’re keeping the part you want before moving on to the next step. Listen to the song by pressing the play button.
- Step #8: To remove the portion shown in yellow from the final image, use the Trim tool.
- Step #9: Tap Save and then Done.
Record Calls via third-party apps on iPhone
Many software companies have taken advantage of the missing feature and introduced a working app.
You have two apps available in the market and they are Rev Call Recorder & RecMe.

You can try the free-to-use apps, but they have a PRO version that starts from $4.99 and if you believe that it is worth trying then go for it.
We recommend the users try the limited version because it will help you make the final decision on whether to subscribe to the service or not.
Note: Many call recording apps are not available in the country due to country laws & policies. The developer choose to avoid a few countries to prevent legal issues with the Apple App Store policy.
Bottom Line
We hope this article was of help to you to know about the software that records phone calls on iPhone. In this article, we made sure to cover all the necessary details that you need to record calls or information on iPhones.
However, it is always necessary to take the other person’s consent before recording them. We hope this article was of help to you, and now you know how to record calls on iPhone. Stay tuned with us for more articles.