
Call failed on your iPhone is a common problem, and you can solve it. Apple offered multiple solutions on the official website, which I’m going to suggest here, and also other important solutions that are not available on the site. I want to inform the readers that you might have a fried carrier chip and requires professional assistance. In this tutorial, I will walk you through solutions to fix the problem, and come to the conclusion to seek professional help.
Why this does happen and how to fix it
Many consumers are reporting that iPhone dropped the call, and having this error frequently due to unknown reasons. Apple bundled the iPhone with highest-grade materials, which should not be the reason why your phone is acting strangely for a while. Your carrier communicates with the device using SIM card and configuration, and failure of communication causes this problem. You should be able to solve the problem by following the solution below.
SIM Card
SIM card is the prime culprit of most of the call failed on the iPhone problems because it could not connect to the network. Remove the card from the device and clean it properly, and avoid cleaning internals. Contact the carrier customer care for a replacement piece, or you can shift to e-SIM, which is a popular choice in many developed countries. Make sure to clean the card with a dry cloth, and avoid using liquid in the process as it could damage the chip inside.
Airplane Mode
The error occurs when the signal is weak or interrupted due to complicated technological reasons. In many cases, the iPhone drops the call in the middle of the conversation, and it is a problem for consumers with a bad network. You can use Airplane mode as a quick solution and it consumes less than 20 seconds to do so.
- Open the “Settings” and toggle “Airplane” mode to enable the option.
- Wait for 10 seconds.
- Toggle “Airplane” mode to disable the function.

Your phone signals should be up and monitor the behavior for a better understanding of the error. This is a quick solution that doesn’t work forever, and you have to identify the root cause of the problem, and that’s when you can take prominent action.
Reboot or Restart the Apple Device
Most of the iPhone consumers don’t turn off the device for months, and the hardware & software problems arise during this period. A quick restart should be enough to push software-related issues to the trash bin and allow 30 minutes of sleep time to the device. Older phones are more prone to these problems as they age, and give a minimum of 30 minutes of shut-eye time in a week.
Enable Voice in LTE
The latest technology of VoLTE is a popular phenomenon around the world. You have to enable Voice & Date in LTE settings to avoid getting errors. Your network might be using a 4G or Wi-Fi network for communication and due to latency problems, your call is getting dropped frequently. Enable “Voice” in the LTE options to take control over the process, and have zero errors.
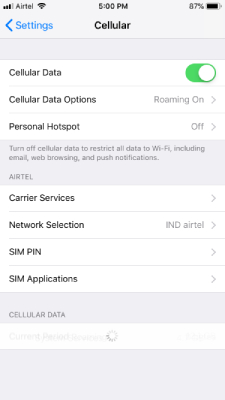
- Open the “Settings” and tap on “Cellular or Carrier” and then “Cellular Data Options” or “Carrier Data Options” to continue.
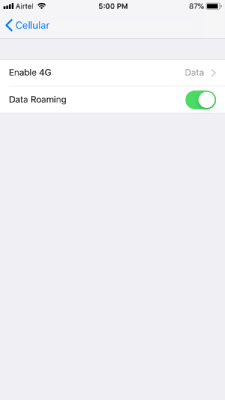
- Click on “Enable 4G” to access options.
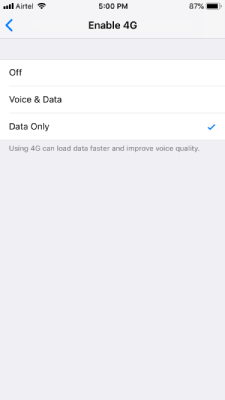
- Tap “Voice & Data” to complete the process.
You can restart the phone if your network requires the consumers to reboot it for the new settings to take effect. I do recommend rebooting the device as it wipes out temporary files, and starts a new session.
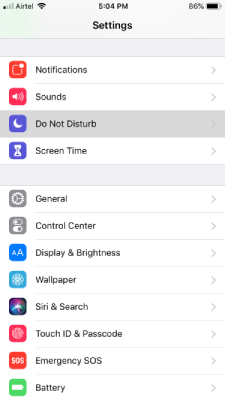
Check Do Not Disturb Mode (DND)
Check, whether you have enabled DND also known as “Do Not Disturb” mode.
- Fire up “Settings” and swipe down to tap the “Do Not Disturb” option.
- Toggle the button to disable it, and if it is already in disabled mode, then leave it be.
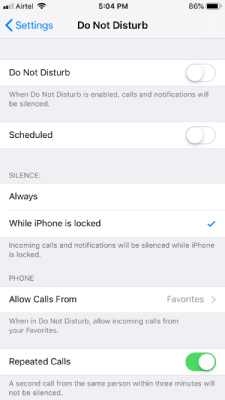
Apple added DND to ensure that you are getting the privacy when needed. There is a risk of forgetting and can land you in trouble later on. Check your DND settings, and ensure that it is not the root cause of the problem.
Disable Call Line ID Restriction
You might have enabled Call Line ID Restriction, which causes the phone to ignore the outgoing calls. You can disable the function by typing specific code in the phone.
Enable Code & Message: *31# to enable it.
Disable Code & Message: *#31# to disable it.
You can double-check, if you have enabled the function to keep the outgoing calls to take place, then you can disable it. I want to inform the readers that there are different codes available based on countries. If you have purchased the iPhone in your country, then you can try region code, and you can use Google for the code.
Update Carrier or Reset Network Settings
It is not uncommon for iPhone and iPad to have a wrong configuration or outdated configuration. Fortunately, Apple thought this through a decade ago and added proper options to update carrier settings. Allow me to guide you through the process, and it consumes less than 15 to 20 seconds to do it.
- Tap the “Settings” to begin the process.
- Select “General” to continue.
- Tap “About” to move forward.
- Tap on “Network” to update the carrier settings.
You will be notified, and if there’s an update available or else, you can move on to another solution.
Apple added enough options for the consumers to fix the device without professional assistance. You have a network reset option that removes every piece of network data and does not touch personal files at all. In this process, you will lose Wi-Fi connections, Bluetooth connections, Carrier configuration, and more.
Your phone should have a minimum 50% charge and SIM card in it. The resetting process consumes less than 5 minutes to complete, and you are good to do. Do not force close the device using the power button and let it land on the home screen.
Bottom Line
Updating iOS is a viable option, but it is your last resort before seeking professional assistance. Do not approach third-party repairing stores as they might capitalize on your situation. Always seek assistance from the official Apple service store and then make your decision.