
Apple added plenty of tools to manage storage so you can take control over the purgeable files on Mac. The American company is releasing new macOS editions to the users and they introduce new features to the consumers. The modern desktop computer operating system brings innovative features that change the computing experience forever.
What is purgeable storage on Mac?
The macOS Sierra came with a new feature called “Purgeable storage space” in the System Storage section. Mac creates the storage space for files that have not been for a long time or a specific period. The system administrator has the power to take advantage of the unused space and clean up to store new files. You can always recover the deleted files from cloud storage, so this is a smart feature added in Sierra 10.12 edition.
There are two ways to get hold of the storage space, which is covered below. There is one more method to get back the space using a third-party program and they are called Mac Cleaners, but we won’t cover it here. Most of the Mac cleaners come with bloatware & they are paid solutions. We will explore all official methods to use the purgeable space in the macOS machine.
You might be wondering what files & documents go into purgeable space? Allow us to give you some examples, so you can clear all doubts.
Manage Purgeable Storage (Automation)
You can let macOS take care of it or take control over the process, which is a suitable option for system administrators.
- Tap on the Apple logo and then choose “About This Mac” to start the process.

- Now, tap on “Storage” to continue.
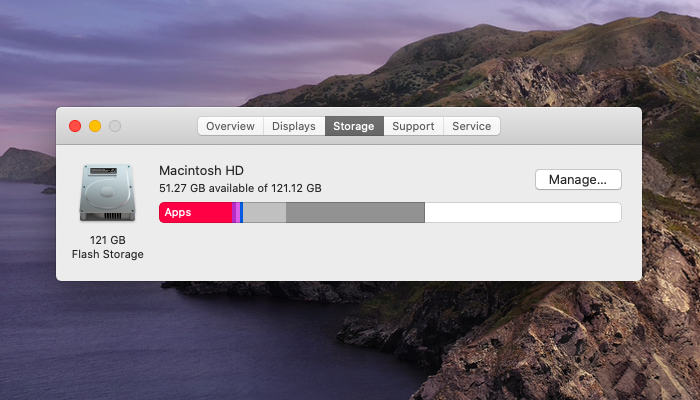
- Let Mac load information about the storage, so you can check out the purgeable storage. Click on “Manage” located beside macOS installed drive and it was 121GB SSD in our case.
- You have four options and you have to empty the storage space manually.

Store in iCloud
iCloud will upload unused & old documents, files, and media files in the cloud storage. All less opened files will be removed from iMac or MacBook machines, and it will download the files when you need them next time. The function will save lots of time and storage because you no longer have to worry about the old files & documents.
Optimize Storage
You can optimize the storage cleverly, where macOS helps the users to remove recently watched TV shows or movies from the list. The Mail app will remove all old files & attachments from the machine and focus on recently received files only. Users can choose to avoid downloading attachments in emails until or unless they open them manually. The storage optimization is all about the smart approach, and it is a handy feature in macOS Sierra or later.
Empty Bin Automatically
Mac will delete the trash bin to remove all unnecessary files, documents, and media from the bin. However, it will delete 30 days old content only because you may need the bin files again. In short, you have 30 days to reclaim the contents, and Mac will automatically delete files that are older than thirty days.
Reduce Clutter
Mac will provide options, so you can review the number of files to remove. We implore the readers to review the section to confirm what you want to remove and what you want to keep. Overall, you can reduce clutter in a macOS machine.
Manage Purgeable Space via Terminal
A terminal is a powerful tool in macOS software and you can finish plenty of tasks using the commands. Apple is very dependent on the Terminal because you cannot accomplish advanced tasks using the basic controls. Let’s run a few commands to remove contents in purgeable storage space and make good use of the free space.
- Open Terminal from Launchpad.
- Copy & paste (mkdir ~/largefiles) the command and press the “Return” button.
- Copy & paste (dd if=/dev/random of=~/largefiles/largefile bs=15m) the command and press “Return” button.
The Terminal window will freeze and you have to keep it that way for given minutes.
Press Control + C together after five minutes to stop the command and continue the work.
- Copy & paste (cp ~/largefiles/largefile ~/largefiles/largefile2) the command and press “Return” button.
- Copy & paste (cp ~/largefiles/largefile ~/largefiles/largefile3) the command and press “Return” button.
- Copy & paste (cp ~/largefiles/largefile ~/largefiles/largefile4) the command and press “Return” button.
- Copy & paste (cp ~/largefiles/largefile ~/largefiles/largefile5) the command and press “Return” button.
As you can see that the last digit is changing to a higher number and macOS will inform that the “disk is critically low” somewhere. You have to keep increasing the number like 6 or 7 until you have the message on the screen.
- Now, copy & paste (rm -rf ~/largefiles/) in the Terminal and press the “Return” button.
- Go back and check the Trash Bin and then empty it.
You can check the purgeable storage on the Mac machine and it will be lower than before.
Our iMac has 731MB purgeable space, which is lower than usual.
Bottom Line
Now, you can make use of purgeable files on Mac and Apple added official options to manage it. We don’t recommend third-party solutions as they are charging for the services and come with lots of bloatware. Apple macOS is optimized compared to Windows & Linux OS, so you should take advantage of the inbuilt options.