
Are you looking for a suitable snipping tool for macOS? That’s an important question for a Windows administrator, who has recently switched to MacBook. Of course, I’m not targeting MacBook only because all Apple computers don’t support Microsoft’s operating system functions. In this tutorial, I will talk about the Snipping Tool for Mac, and clarify, what is possible, impossible, and solutions for the Apple computer consumers.
What is the Microsoft Snipping Tool in Windows?
Snipping Tool introduced on November 7, 2002, in the newer edition of the Windows XP operating system. Microsoft added a desktop screenshot capturing program and editor available in the newer editions of the Windows OS.
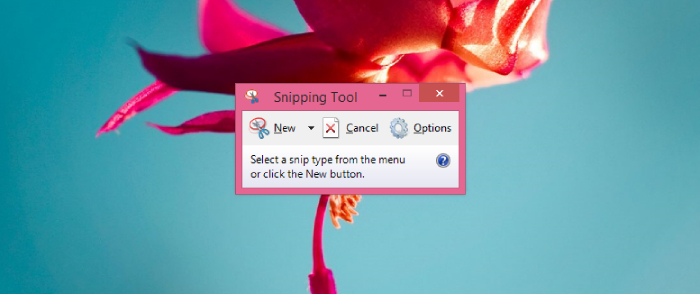
Currently, I am testing the screenshot capture program on Windows 8.1 and Windows 10 latest edition. The inbuilt screenshot capturing program allows the administrators to save the file in GIF, PNG and JPEG format. During my test, I found the picture quality to be decent but I was not happy about the increased file size because I have been using many screenshot capturing solutions, and they save the file in lowest file size.
Can we get the Snipping Tool on macOS?
Apple invented the macOS operating system for MacBook & iMac computers and they come under the premium segment because of the price and performance of the machine. Unfortunately, Apple does not provide Microsoft operating system features in macOS because they want to maintain the uniqueness of the product. Apple products always targeted customers, who are looking for premium products, and unique approach to the problems.
I should point out that Apple is extremely slow when it comes to keeping with the new technology. Unfortunately, Apple does not bring new features and innovative technology to the platform on a yearly basis, despite putting the premium tag on the commodities.
Screen capture or screenshot function is available on iOS & OS X operating system. I should say that they have introduced the feature on the platform a little bit late because Microsoft implemented it in 2002. Microsoft & Linux is way ahead of Apple’s so-called innovative operating system.
How to use Screenshot capture tool on Mac?
Unfortunately, Snipping Tool is not available for macOS operating system but I will guide the readers through the process of default screenshot capturing tool. Follow our instructions to save a desktop screenshot or specific window screenshot, and I will explain every variation for better outcomes.
Take Customized Screenshot:
Press Shift + Command + 4 and use the dragging function to create a customized screenshot.

I personally use this function to take a customized screenshot and avoid editing the image later on.
Capture Specific Location:
- Open the window such as Firefox browser, File Explorer or anything else.
- Now, press Shift + Command + 4 + Spacebar. The mouse pointer will change into the camera app icon.
- Press once on the selected window to capture the screenshot.
A small window containing the newly taken screenshot appears in the corner of your screen. Click on the screenshot to start editing the image or leave it alone to disappear, and save it to the desktop. In the older version of macOS, the default location remains desktop, but you can change the default location in macOS Mojave.
Capture Entire Screen:
Press Shift + Command + 3 and then the screenshot will be saved to the desktop.
Of course, the newly taken screenshot appears on the corner of the screen and you have the power to edit it right away. You can leave it alone and it will automatically save the file in targeted location or on desktop.
Now that I have shown you how you can take a screenshot using the Apple version of the Snipping Tool, I would love to know your feedback in the comment section below.
In my frank opinion, Windows Snipping Tool desperately needs improvement because it lacks plenty of editing options and requires an inbuilt compressor to decrease file size. I do appreciate Microsoft implement but I am currently using an alternative that will definitely put inbuilt features in competitive mode.
3 Best Alternative to Snipping Tool for Mac 2020
I have been using multiple screenshots capturing programs for a long time. However, I have always kept my distance from the Microsoft snipping tool because it lacks plenty of modern features and functions. I should inform the readers that there is an advanced & easy-to-use solution out there unexplored.
Snappy
Snappy is an advanced screen capturing tool and it is used by thousands of professionals around the world. Machine owners can capture the screen in an instant and edit the picture to give it a new meaning. Many advanced editing options are available and customizations are not a problem in the program.
Moreover, you have a cloud synchronization feature available and add the password to keep it secure from unauthorized people. The inbuilt organizer keeps every single screenshot secure and organizes it safely, so you won’t get confused later on. The program is capable enough to capture visual notes, so you can read them later on.
Lightshot
I recommend every Windows & macOS consumer to try Lightshot because it offers easy-to-use and quick screenshot features. I have been using Lightshot for two years, and I can tell that it will entertain professional individuals and personal usage.
Meanwhile, you can add new elements in the picture, before capturing the screenshot, and that’s what made Lightshot extremely popular among professional people. You can add arrow, text, select color, Drag & Drop, save the file in the desired location every time, and more. Overall, Lightshot pictures deliver standard quality and keep the file size lowest as possible.
Screenie
Screenie is a free-to-use program for macOS that promises to deliver free lifetime software updates. The screenshot tool offers tons of customization options for the premium macOS consumers. The drag function allows the macOS administrators to capture screenshots instantly from the menubar icon. Save the newly captured image in multiple file formats such as PNG, PSD, JPG, and more. Currently, the latest version designed for macOS Catalina, but you can use Screenie V1 for the older operating system.
Bottom Line
I mentioned three Snipping Tools alternatives for macOS machines because that’s all you need to keep ongoing. I should say that Apple did a fabulous job in shaping desktop-class and smartphone-class screenshot tool for the MacBook, iMac, iPhone, and iPad.