
Apple launched a new product recently and it is possible, AirTag stops working due to minor issues. You can fix all minor issues related to the AirTag without using additional tools or third-party tools in the process, The small-sized technology is fairly new and millions have no idea how to fix the issues and that’s what we are going to cover in this tutorial.
AirTag Technology Shortcomings
Apple is known for perfection, but it’s not entirely true, and I’m not bashing the company at all. The world itself is imperfect, and AirTag is a small part of it. The small piece of technology is fairly new, and it is the first generation module. Millions are facing software-related issues now and then due to its first-gen aspect.
- The tag is not responding to the “Find My” app.
- iPhone or iPad is not recognizing the tag.
- AirTag is not working at all.
- None of the devices is recognizing AirTag, even after pairing it multiple times.
- Faulty device.
I have listed a few issues that thousands are facing with the first-gen AirTag. The number of solutions is lesser in the community because the device is introduced to the world recently and it has minor flaws as well.
Let us look at a few solutions that bring the tags back to life.
Restart Device & Update Software
A quick restart should do the trick, so give it a try before applying any solution.
Your iOS device may have received an update related to the AirTag.
Make sure to read new iOS software online reviews and videos to confirm, whether it is suitable for your device or not.
Shutdown Connectivity
The device is depending on modern wireless technology, and it is designed to work with iPhone and iPad. However, your iPhone or iPad may have an older chip, which is causing the problem. Do not worry, this is your iOS device, nor AirTag problem.
All you have to do is to cut off all wireless communication modules in the iPhone or iPad. Yes, I’m talking about Wi-Fi, Bluetooth, and Cellular because it is causing the issue. The third-party wireless technology may seem sophisticated, but it isn’t closer to perfection.
A quick reboot will dump all temporary files in the trash can and remove software-related glitches. There is no harm in rebooting the smartphone but make sure to save background work before proceeding.
Turn on Two Layer Security
Apple added traditional Two-factor authentication in the latest AirTag because it’s effective and strengthens the security at the same time. However, the small device requires 2FA enabled in the iOS device, but it is compulsory.
- Open the Settings and then tap on Apple ID.
- Choose “Password & Security” to continue.
- Check, if “Two-factor authentication” is turned on or off.
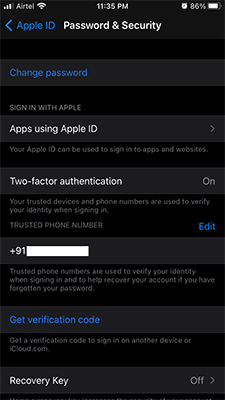
In case, if it is disabled, then you have to enter mobile below and add security questions to enable 2FA in the iPhone or iPad. Tap on “Edit” located below the trusted phone number and add mobile numbers.
Enable Find My Feature
Apple created the “Find My” app for iPhone, iPad, and Mac computers, so you can locate the devices when they are not with you. You have to enable the feature in the iOS device to let the AirTag connect with iPhone and iPad. Find My feature is not enabled by default, and you have to do it manually on the iOS device.
- Tap on the Settings > Apple ID > Find My.
- Choose “Find My AirTag” to continue.
- Toggle to enable the “Find My AirTag” feature.
- Open the “Find My” app and tap on “Settings.”
- Toggle “Location Services” to enable it and choose “Find My” from the list.
- You have three options on the screen.
- I have selected “While Using the App” to continue.
- Go back to the “Find My” app.
- Tap on the “Continue” button.
- Your AirTag is visible and working as it should be.
Find My feature plays an important role in AirTag functionality, and it is essential that you double-check its activity.
Re-pair AirTag
As we have mentioned earlier, AirTag requires Bluetooth & the internet to create a secure connection, and wireless technology has shortcomings. You have to re-connect the device with iPhone and iPad again, and it does help kick off the software-related glitches and bugs.
Allow us to show you how you can remove the AirTag.
- Open the “Find My” app.
- Tap on “Items” located at the bottom.
- Choose your AirTag to continue.
- Choose “Remove” and then tap on “Remove” to confirm the action.
Close all background apps and then shut down the iPhone or iPad. Power on the device and then re-connect the AirTag.
Re-insert Battery
It’s time to go back to the old ways and remove and then re-insert the battery.
Apple uploaded the AirTag battery replacement tutorial on the official website, and you can learn the technique visually.
- Turn the battery upside-down.
- Press down the stainless steel with your thumb.
- While you are pushing it down, rotate the stainless steel cap counterclockwise or right to left.
- The stainless steel cap will come off easily.
- Remove the battery.
- Let the AirTag sit on the sideline for a minute and then re-insert the battery.
Now, AirTag should work normally with iPhones and iPad.
Make sure to keep your hands and fingers dry throughout the process. Do not clean the battery with a random cloth as it may contain small particles that can create new issues. You can consider battery replacement if you believe that the stock battery is faulty and it’s cheap.
Reset iOS Device Network Settings
Your network settings may be driving AirTag crazy, and you can resolve it with a quick reset. Network settings carry saved Wi-Fi points, saved Bluetooth points, saved cellular points, and more. Resetting the network configuration will remove all saved points, but you can save them again.
Your data won’t have tampered with during the process, and there is no risk of data loss. However, I do recommend a quick iTunes backup creation as a precautionary measure.
- Tap on the Settings > General > Reset.
- Choose “Reset Network Settings” to continue.
- Confirm the action by tapping on “Reset Network Settings”. Your iPhone or iPad will ask for Touch ID or Face ID or password to confirm the action.
- Your device will restart and land on the Apple progress bar.
Let the iOS software remove all network settings and it takes less than a minute on newer hardware and five minutes on older hardware.
Reset AirTag
There is a way to reset the AirTag, but it is a little annoying, and it works.
- Remove the stainless steel cap from the backside.
- Remove the battery for five seconds.
- Repeat the process five times in a row.
You should be able to hear a sound, so calculate the sound, and it should be five times.
AirTag will reset after five times, and you have a sound notification as proof.
Bottom Line
Thousands could not solve the AirTag detection issue due to several reasons. You can seek assistance from Apple Store if none of the solutions we’re able to fix the issue. Do not assume that this is a hardware issue before applying all solutions properly. Book an appointment with Apple to claim the warranty and get a replacement.